SharePoint drop box using Power Automate
Introduction
I was asked how we can create a SharePoint library which allows somebody to upload files to it, but not read any other files in the library.
It felt like a simple and pretty reasonable request. My colleague Grant made me aware of the Enable File Requests feature in SharePoint or OneDrive which might achieve this requirement, but unfortunately as it is designed for more external usage, the pre-reqs require things like Anyone links to be enabled.
I looked into other out of the box options.
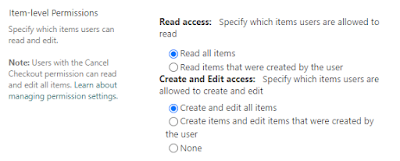
Permissions on SharePoint Lists and SharePoint Document Libraries are similar, but not exactly the same. I say permissions, I guess it is more advanced settings for Lists have Item-Level Permissions which give the ability for the user to only read items that were created by them.
 |
| Lists Item-Level Permissions |
Nothing exists like this in SharePoint document libraries unless you break permission propagation on every file which isn't scalable from a management or performance perspective.
If you give someone Add permission to a document library, they will get Read by default.
So how do we allow someone to drop files into a directory without see anything else there?
My solution was to create a document library which acts as the drop box and then have a Power Automate Flow which moves the files to a secure area and deletes and files/folders from the drop box area.
The only slight downside here is that there could be a small lag time whilst the Flow is running, but this was acceptable to the person who requested it.
How it works?
A Power Automate Flow is triggered when a file or folder is added to the source document library.
This will determine whether it is a file or folder.
If file, it will check the target document library has the same folder structure and if not, it will create it. Then it will move the file and finally delete the file from the source directory.
If folder, it will loop until the source folder is empty and then delete it. This ensures that no folders are left behind and that the folder is not deleted whilst files are being moved too.
 |
| Flow snippet |
How to use it?
Setup a SharePoint site with two document libraries. Set the permissions on each to match this scenario (source being add/read to normal users, target being only accessible to admins).
Import the zip into make.powerautomate.com and update the connection. Then edit it and change the trigger SharePoint site. You then need to update the variables for SharePoint site name, URL and source and target folder names. This will update the rest of the actions.
Video
This video shows how to use the Power Automate Flow.
bank drop box image from https://www.flickr.com/photos/chuckthewriter/4749587614


Comments
Post a Comment